
It can be painfully annoying getting your hands dirty, putting in the effort towards homemade pizza, only to end up with dough that rips, tears, smells funny and doesn’t cook properly.
People give up and turn to the frozen food aisle, which I lovingly refer to as the pizza graveyard! If you want to cook a dead pizza, head over to the supermarket.
Now, if you want a delicious pizza with a thin crispy crust, flavourful dough that’s light, fluffy and bounces back with beautiful air pockets – listen up.
Below I’m going to walk you through how you can make three of my favourite pizzas, and save money doing it, at under 5 bucks each! Not only that, but I’ll give away some super-secret pizza tips that will take your homemade dough and homemade pizza to the next level!
You’ll be able to enjoy restaurant-quality pizza at home, anytime you like and with minimal effort and frustration. No more waiting for pizza coupons in the mail, dealing with inconsistent bakes or worse, eating frozen food aisle pizzas.
Ready to make some homemade pizza dough?
Homemade Pizza Dough Process
Alright, briefly I want to mention that although these tips are going to help you make great pizza, my aim is to also make this as easy and accessible as possible.
I want you to get great results with the materials most of you have in your kitchen. I’m not going to tell you to spend hours making your own homemade San Marzano tomato sauce. I’m not going to tell you to go buy a $1200 dedicated, gas pizza oven for your deck or build a full-fledged wood-fired pizza oven in your backyard.
I’m also well-aware that bakers use weights and percentages for a reason, but most people don’t have kitchen scales and don’t enjoy math. So for the purpose of this article, I’ll be providing measurements in cups and teaspoons, as well as in weight for you pro home chefs. Either way, the aim of this is to make a great homemade pizza, in a reasonable amount of time and effort.
Okay, so now that we have that out of the way, we need our tools!
Pizza Making Tools (Must Haves)
- Mixing Bowl for Ingredients
- Measuring Cups & Spoons (or Food Scale)
- Plastic Container for your Dough Ball
- Pizza Tray or Baking Tray
Next, you’ll need your basic ingredients for creating your epic homemade pizza dough! We’ll get to all the fancy stuff, like toppings and secret ingredients later.
Homemade Dough Ingredients
- All-Purpose Flour
- Water
- Salt
- Sugar
- Yeast
- Olive Oil
Finally, these are a few helpful items that are nice to have, but not totally necessary. You can actually make your dough with nothing more than your hands if you really want to.
Pizza Making Extras / Nice to Haves
- Stand Mixer w/Dough Hook or Spiral
- Dough Scraper
- Silicone Brush
- Pizza Stone
The Dough Making Process
There are lots of ways to make your pizza dough, but I find this method is fairly easy, not overly time-consuming and delivers great results. It also works just fine with all-purpose flour and provides decent flavour. This way, you don’t necessarily have to go to the trouble of searching for hard-to-find ingredients. However, you can use bread flour if you like, or if you are a serious pizza aficionado and want to get really fancy, try a ’00’ (Tipo) flour such as King Arthur.
This recipe will make 1 Large Pizza Dough
| Ingredient | Measurements |
|---|---|
| All Purpose Flour | 2 cups / 300 grams |
| Water | 1 cup / 236 grams |
| Salt | 3/4 tsp / 5 grams |
| Sugar | 1/2 tsp / 3 grams |
| Yeast | 3/4 TBSP / 7 grams |
| Olive Oil | 2 tsp / 9 grams |
1. Autolyse
If you want flavourful homemade pizza dough, you have to give your dough time to develop those flavours! While this isn’t the fastest method to make pizza dough, the actual “working” time involved isn’t excessive.
I like to mix my dough before going to bed (or you can do it first thing in the morning around 7 am), so it’s ready to bake for dinner time.
Here’s how to start.
- Add 2 Cups (or 300g) of flour to your mixing bowl
- Add 1 Cup (or 236g) of water
- Mix and then knead the ingredients in the bowl for 1-2 minutes until the dough starts to form loosely and no dry flour remains
- Cover your bowl with a tea towel or plastic wrap and let the dough rest for 20-30 minutes
So why are we doing this? This is what’s called autolysing and helps create stronger gluten development in your dough. It will make your dough easier to stretch and easier to handle, while allowing it to expand more easily when baking and form a nice open crumb structure. It will also help add great flavour and aroma, giving you a better quality final product.
2. Knead the Dough
- Sprinkle in 3/4 tsp (or 5g) of salt
- Add 1/2 tsp (or 3g) of sugar
- Add 2/3 TBSP (or 7g) of instant dried yeast (or one packet)
- Drizzle over top, 2 tsp (or 9g) of olive oil.
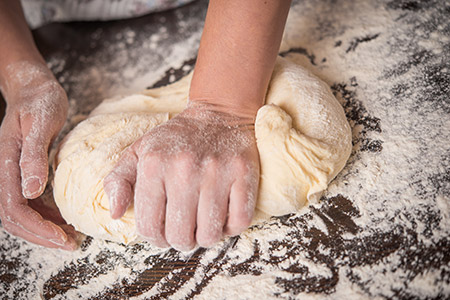
Once these remaining ingredients have been added you can begin to mix or knead your dough together either by hand or using a stand mixer.
With the stand mixer, I just let it run on low speed for about 6-7 minutes and then finish it off with about a minute on medium speed. You may want to scrape down the sides of the bowl as you go if it’s not catching all the dough. Just make sure you turn off your mixer while you’re doing this! If you’re kneading by hand, you can work your dough for about 8-10 minutes, until it starts looking smooth.
There are a lot of good kneading tutorials online, but you are just basically working the dough with your palms and pushing it outwards and then folding it back in on itself, over and over.
After mixing and kneading, I will very lightly dust my working surface with flour, you don’t want your dough picking up too much flour. Then, give your dough a couple of stretches and folds before balling. You do this by pulling the dough outwards and then folding it back on itself towards the centre on all four sides and repeat.
How do you know when your dough is done? Your dough should be smooth, and when you hold it up in the air from its’ edges, you will get what is called the “windowpane effect.” The dough will hang down and stretch just enough that visible light will come through it, but at the same time the dough won’t break. If your dough is looking like this, you can do a final stretch and fold.
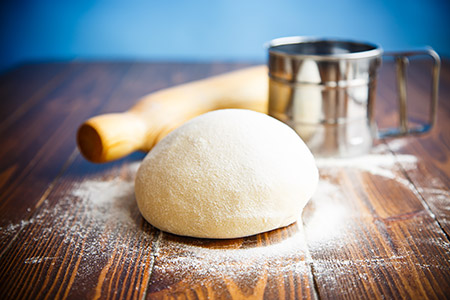
3. Ball Your Dough
4. Fermentation / Proofing Phase
Place your dough ball back into the bowl or into a container and pop it into the fridge. This will be before you go to bed, so when you go to make dinner tomorrow night, your pizza dough has had around 18 hours to slowly proof in the fridge and develop beautiful air pockets throughout, helping to maximize flavour.
Quicker Proofing
If you just want a fast pizza dough (but you’ll lose some flavour) you can proof the dough at room temperature (or even inside your microwave with the door closed, similar to a proofing box for bread). Just add a glass or jar of hot water inside along with the bowl of dough (covered with a towel) and close the door to create a warm and humid environment. This will make your dough rise faster.
Using this method, your dough will likely double in size after 1-1.5 hours depending on the temperature and humidity. Afterwards, you can punch your dough down to take the air out, and begin Step 5.
5. Forming Your Pizza Dough
Back to our overnight dough! I like to take my dough out of the fridge about 1.5-2 hours before I plan to shape it. If I want my Pizza dinner at 6 o’clock, I’ll take my dough out around 3:30. This gives it the required time to warm up and also leaves me about an hour to shape, add ingredients and bake.
Your dough needs to warm up because cold dough doesn’t stretch well. Do your best to get your pizza dough to room temperature before you start shaping it. I’ve seen so many people get frustrated and over-work cold or frozen dough balls from the supermarket. If you stretch out your dough and it pulls back on itself, just let it rest for a few more minutes and come back to it. It simply needs time to relax and warm up.
Trying to force it or roll it out with a rolling pin is a big “no-no”. You’ll end up with overworked and dense pizza dough, rather than the desired light, fluffy and crispy result.
 6. Final Shaping
Everyone can make a circle, right? Well, you’d be surprised.
I’ve seen some sadly-shaped pizzas, uneven crusts and other messes as a result of bad or cold dough or just impatience.
Tip number one – throw your rolling pin away as mentioned. There’s a reason it’s not on the list of tools.
Tip number two – before baking, lightly dust your work area with cornmeal. This will help keep your pizza crust from sticking to the working surface or the pan while giving your pizza’s crust a little more texture and crispiness. If you don’t have any, you can use flour as well..
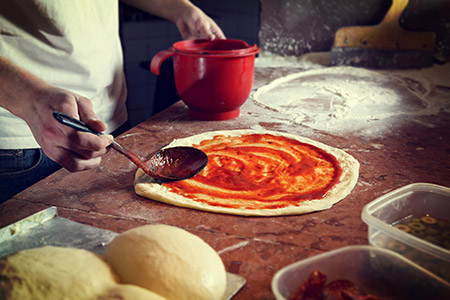
An easy method to form your pizza shape is to pass the dough back and forth between your palms a couple of times to about half the size you want the final product. Then, lay it down flat and gently use your fingers to push down and outwards from the centre to the edges – almost as if you were getting ready to type on a keyboard, then opened your fingers outward. I usually prefer to shape it right on the pan.
This method can help preserve those nice air pockets in your dough to give the pizza its light and fluffy texture Our autolyse we did in the beginning, should make your dough more elastic, relaxed, and easier to work with. Massage your dough, don’t mash it when forming the final shape.
I like to get a fairly thin layer of dough as the base since it will rise on its own, then leave a slight ridge around the edges for the crust, about double the thickness of the base of the pizza. If your dough was done right, it will seem thin but will puff up once it’s baked.
Pizza Dough Costs
Now that your pizza dough is ready to go, let’s go over the cost of a large-sized homemade pizza dough.
| Ingredient | Cost metric | Total Cost |
|---|---|---|
| 1 cup water | < 1¢ | $0.00 |
| 2 cups of all purpose flour (300g) | 0.1347¢/100g | $0.40 |
| 3/4 TBSP of instant dry yeast (7g) | 4.19¢/100g | $0.29 |
| 3/4 tsp of salt (5g) | 11.7¢/100g | $0.01 |
| 1/2 tsp sugar (3g) | 10¢/100g | $0.01 |
| 2 tsp of Olive Oil (9g) | 0.797¢/100ml | $0.07 |
| TOTAL COST | $0.79 |
Toppings & Artisan Touches
Here are the other special ingredients you’ll need for our pizzeria quality pizzas and the toppings broken down by Pizza type (Pepperoni / Hawaiian / Deluxe)
Dough
Once you have your dough stretched out, I like to sprinkle a little garlic salt, oregano and a touch of basil over my pizza dough. This adds in some additional flavour, not to mention, smells amazing!
Sauce
For the tomato sauce, you can test out different tomato sauces to see what you like best. I find this can vary depending on your own taste. Personally, one of my favourites is Classico Sweet Basil Marinara, which you can pick up for about two bucks a jar. Don’t go too heavy on the sauce, you only need a thin layer – we aren’t cooking a lasagna here.
Cheese
You also want a decent quality mozzarella cheese, I find the better quality cheeses usually don’t crumble as much when you grate them and are smooth. I don’t find much difference in cheeses that are branded as “Pizza Mozzarella” versus just plain mozzarella. Grate your cheese however you like and distribute evenly! If you want to put extra cheese on your pizza, I won’t argue.
Pepperoni
Finally, for pepperoni, if you’re getting pre-packaged from the store I’d highly recommend Hormel Pepperoni. It’s got a great flavour with a bit of kick/spice to it and is the perfect thickness to crisp up on your pizza when baking.
Necessities
- Tomato Sauce
- Mozzarella Cheese
Artisan Extras
- Garlic (minced)
- Garlic salt
- Oregano
- Basil
- Cornmeal
Toppings for our Pizzas
- Pepperoni
- Ham
- Pineapple
- Italian Sausage
- Green Pepper
- Mushrooms
- Onions
 Top 10 Most Popular Pizza Toppings
- Pepperoni
- Mushroom
- Extra cheese
- Sausage
- Onion
- Black olives
- Green pepper
- Fresh garlic
- Tomato
- Fresh basil
3 Restaurant Quality Pizzas under $5!
Below are our three special homemade pizza ingredient lists with the approximate costs of each, plus a bonus pizza for the super cheap. If you think you can do this even cheaper than you’re probably American – because our cheese is expensive in Canada! And if you think you aren’t saving much money from delivery, well, there’s something to be said for the satisfaction of digging into your own homemade pizza creation and sharing it with your friends and family.
So here we go, a breakdown of the costs to make these three classic pizzas at home.
Pizza 1 | Classic Pepperoni
The classic pepperoni pizza is a favourite of everyones. Pepperoni isn’t the cheapest topping, but it’s one of the most delicious. Especially when you’re LOADING your pizza with it to make a proper pepperoni pizza,
| Ingredient | Cost metric | Total Cost |
|---|---|---|
| Large Dough | 0.79/large | $0.79 |
| Sauce | 0.31¢/100ml | $0.18 |
| Mozzarella Cheese | 0.99¢/100g | $2.00 |
| Pepperoni | $3.41/100g | $1.66 |
| TOTAL COST | $4.63 |
Pizza 2 | Hawaiian – Pineapple & Ham
Hawaiian Pizza may be one of the most controversial pizza’s in the world, thanks to its secret tropical fruit ingredient – pineapple! Some love it, and others despise it, but did you know that in 2020 Pineapple Pizza was the most popular pizza in the U.S.? And apparently, PPineapple Pizza was invented in Canada.
| Ingredient | Cost metric | Total Cost |
|---|---|---|
| Large Dough | 0.79/large | $0.79 |
| Sauce | 0.31¢/100ml | $0.18 |
| Mozzarella Cheese | 0.99¢/100g | $2.00 |
| Ham | $1.70/100g | $1.50 |
| Pineapple | $0.31/100ml | $0.42 |
| TOTAL COST | $4.89 |
Pizza 3 | Deluxe – Sausage, Pepperoni, Green Pepper, Mushrooms, Onions
There are probably a few different variations on a Deluxe Pizza, but after weeks of research, I discovered the most common deluxe ingredients seemed to be sausage, pepperoni, green peppers, onions and mushrooms. The correct proportion of each ingredient, I’ll leave it up to you!
| Ingredient | Cost metric | Total Cost |
|---|---|---|
| Large Dough | 0.79/large | $0.79 |
| Sauce | 0.31¢/100ml | $0.18 |
| Mozzarella Cheese | 0.99¢/100g | $2.00 |
| Italian Sausage | $1.00/100g | $0.50 |
| Pepperoni | $3.41/100g | $0.55 |
| Green Pepper | $0.99 | $0.30 |
| Mushrooms | $0.86/100g | $0.45 |
| Onions | $1.09 | $0.22 |
| TOTAL COST | $4.99 |
Bonus Pizza | Super Frugal Cheese
Last but not least, is my super-light, thin-crusted cheese pizza. This is a good pizza for a snack – tasty but without all the calories of some of the others. Not only that, but it’s a frugal option coming in below the two-dollar mark.
| Ingredient | Cost metric | Total Cost |
|---|---|---|
| Large Dough | 0.79/large | $0.79 |
| Sauce | 0.31¢/100ml | $0.10 |
| Mozzarella Cheese | 0.99¢/100g | $1.00 |
| TOTAL COST | $1.89 |
Baking Your Pizza
First, get a decent vented pizza tray so you can get enough heat in the bottom to form a nice crisp crust. Another option is to get a pizza stone, which will be pre-heated in the oven and retain heat for a more even bake.
A big key to any of these methods is to get your oven as hot as it will go. Most conventional ovens will probably only reach about 500°F, unlike proper pizza ovens that will get up to around 900°F and cook a pizza in just over a minute!
So for the purpose of doing this at home and making things easy, I like to crank my oven to 500°F and form my dough on a pizza pan. Once the oven is preheated, I will cook my pizza for about 10-12 minutes on the middle rack, rotating it once, halfway through the bake. Everyone’s oven will be a little different, so it’s best if you can keep your eye on it just to make sure the crust on the bottom isn’t burning.

This gives a nice char to the top layer and finishes your pizza off as close as you’ll likely get to a real wood-fired oven. It may not look as good with the classic leopard spotting around the crust, but it will still taste delicious.
One other quick trick to try if you don’t have a pizza oven is cranking up your barbeque and sliding your pizza tray onto it. I can usually get my bbq hotter than the oven, and as a bonus, it gives the pizza a nice smokey bbq flavour and smells amazing! You may find that your pizza gets a little too crispy on the bottom from the flames. If this is the case, I’ll either use a stone beneath the pizza tray or a second, solid metal tray underneath so the bottom’s not in direct heat from the flames.
The Finishing Touches
If you feel so inclined, you get a small pan going on your stove or bbq’s side burner with a small scoop of butter or margarine mixed with some crushed garlic. Melt and stir together on medium heat so it’s ready when your pizza comes out. When you do finally pull your pizza out of the oven, brush that delicious garlic butter around the edges so it melts into the pizza crust.
Slice that pizza up as you desire with your pizza cutter, and watch as your friends and family ask you what’s in this thing, how it’s so good and what pizzeria you got it from?
Conclusion
This is a wonderful and fairly easy way to make restaurant-quality pizzas in your own home and at a lower cost. Not to mention you can choose your own toppings and ingredients, and everything is fresh!
There are probably a few pizza perfectionists (or possibly Italians) getting angry at me for suggesting to use spaghetti sauce or a conventional oven, but that’s cool. This isn’t a precise and perfecto, authentic pizzeria process we’re following. It’s the way I like to do it and is quick, painless and anyone can replicate it at home!

 6. Final Shaping
 Top 10 Most Popular Pizza Toppings


I’m getting hungry reading this! We just started getting into homemade pizza dough and many of our crusts are turning out in the sad shapes you mentioned, ha ha!
We even used special pizza dough yeast that’s supposed to make the dough keep its shape and not constantly shrink back down… but so far, it hasn’t worked.
My husband has now turned to making pan pizzas in our cast iron pans and that seems to work really well (but it’s slow, since we can only make one small/medium pizza at a time).
I’ll be sure to share this post with him so we can up our pizza-making game! thanks for sharing your tips!
Ah yes, the cast iron versions can be good too but are tricky to cook well I find. I didn’t even know there was special yeast specifically for pizza 🙂 I think the biggest things to look at if your dough is not shaping well is that temperature (not being too cold) and not overproofing. Once it’s laid out and gets to around room temp, I try to shape it only once. If you start folding it again after it’s proofed or if you stretch it out and don’t like it and try again, it usually turns out badly (as in mishappen!) I’m really curious to see how your pizza turns out if you do try some of the tips.